For drivers and passengers of heavy-duty trucks, the air conditioning system is crucial to comfort and productivity during long hauls. Therefore, understanding the key steps involved in repairing these systems can not only ensure a more comfortable ride, but also prevent costly breakdowns. Below is a comprehensive guide to repairing heavy-duty truck air conditioning systems.

The first step involves diagnosing the problem. This can range from issues with the compressor, refrigerant leaks, clogged condensers or malfunctioning fans. Use of tools like AC gauges and leak detectors can be highly beneficial in this process.

  • Screwdrivers
  • Pliers
  • Socket set
  • Multimeter for electrical testing
  • Refrigerant manifold gauge set
  • Refrigerant (depending on the system type)
  • Leak detection dye or tool

Remember that safety is paramount when dealing with refrigerants. Always wear gloves and safety glasses.

Compressor

The compressor is the heart of any AC system. If it fails, it can cause many problems including lack of cool air. Some signs of a failing compressor include leaking refrigerant, strange noises when the AC runs and inconsistent cooling.

Repairing or replacing a compressor involves evacuating any remaining refrigerant from the system to prevent its escape into atmosphere – an environmentally harmful event.

Leak Repair

Refrigerant leaks are another common issue with truck AC systems. These could occur at any part – from the condenser coils to connections between components.

Leaks can be detected using dyes or specialized leak-detection tools that ‘sniff’ for refrigerants in the atmosphere around hoses and components. Once located, leaks are typically repaired by replacing faulty parts such as O-rings or seals.

Condenser

The condenser is responsible for dissipating heat carried by the refrigerant from the cab. If clogged or damaged, it can cause overheating and reduced cooling efficiency.

Cleaning a clogged condenser often involves a simple process of blowing compressed air through it to remove debris. More serious damage may require replacement of the unit.

Fan Motor

The fan motor plays a vital role in pushing air over the condenser coils to aid in heat dissipation. A faulty fan can result in poor cooling performance or even overheating.

Replacement typically involves disconnecting the old motor, removing it, and installing a new one in its place – while ensuring correct alignment and connection of electrical cables.

In all these steps, remember that each truck make and model may have slightly different AC systems. Always refer to your vehicle’s service manual for specific instructions. After all repairs are done, don’t forget to recharge the system with correct type and amount of refrigerant – an essential step towards ensuring good cooling performance.

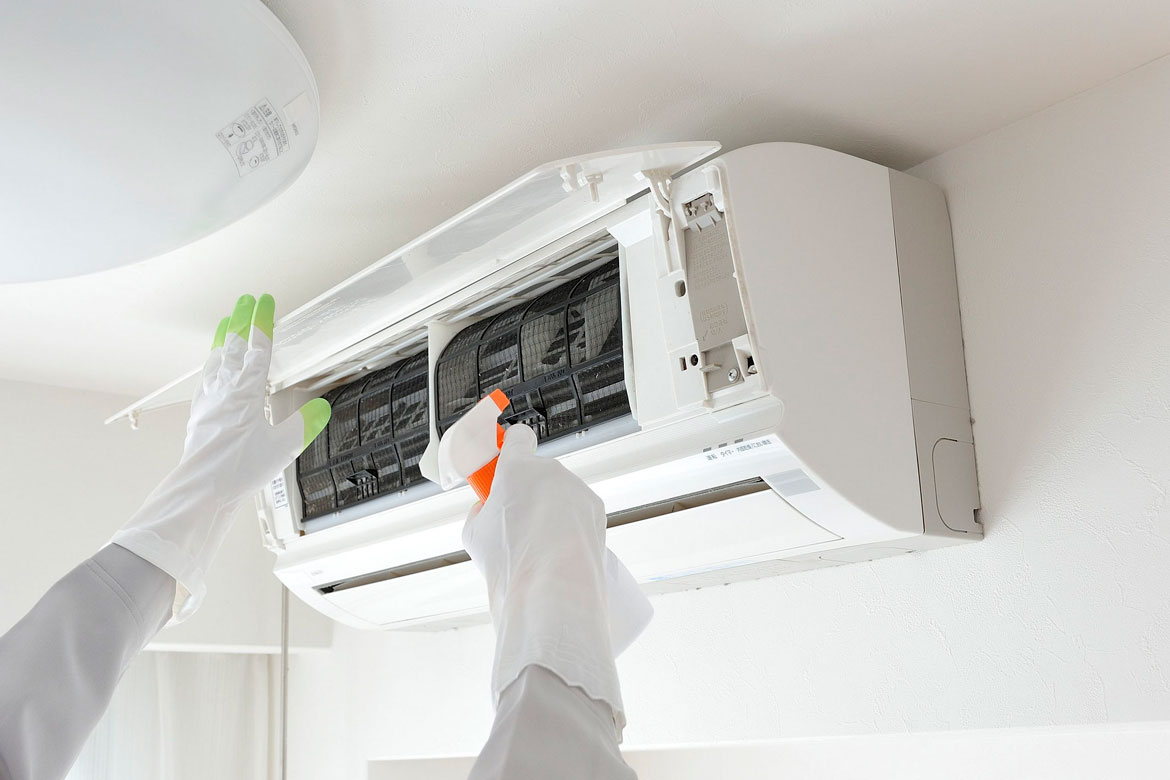
Air conditioning units, whether they are standalone or part of a larger HVAC system, require regular servicing to ensure optimal performance. Here are the essential steps that professionals follow when servicing air conditioning units.

Step 1: Initial Assessment

The first step in professional servicing involves a thorough inspection and assessment of the unit. This process will help technicians detect any visible signs of damage or wear, such as leaks, rust, or excessive dust buildup. They will also check the unit’s operation and performance to identify any unusual noises or vibrations.

Step 2: Cleaning

After completing the initial assessment, technicians proceed with cleaning the different parts of the air conditioning unit. This includes dusting and vacuuming the coils, vents, and filters to prevent any blockages that could impair airflow. In some cases where dirt is lodged deeply into these components, a chemical cleaning solution may be used.

Step 3: Checking Electrical Connections

Technicians also check all electrical connections within the air conditioning unit during servicing. Loose or damaged wires can create safety risks and affect the performance of your AC unit. Corroded contacts and terminals are cleaned or replaced as necessary.

Step 4: Refrigerant Level Adjustment

The right amount of refrigerant is critical for effective cooling. As such, technicians will check refrigerant levels during professional servicing to ensure they are within the recommended range. If necessary, they’ll add more refrigerant to your air conditioning unit.

Step 5: Checking Thermostat Settings

Proper thermostat settings can not only ensure comfortable indoor temperatures but also efficient energy use. During a service visit, technicians will verify that your thermostat is properly calibrated and responding correctly to user commands.

Step 6: Final Checks and Testing

After all these steps have been carried out, professionals conduct final checks on all aspects of your AC system by running it through a full cooling cycle. They will monitor the system to ensure it is operating correctly and efficiently. Any issues detected during this final testing phase are noted for further investigation or future repair.

Regular professional servicing of air conditioning units can extend their lifespan and enhance their performance while reducing energy use and costs. Therefore, it is strongly recommended for all homeowners and businesses to schedule regular AC service appointments to maintain their units in good working order.

Air Conditioning Repair Woodbridge VA: Comprehensive Guide to Evaporator and Condenser Cleaning Procedures

Read about HVAC Repair in Woodbridge VA on Blogspot.

An integral part of air conditioner repair is maintaining the cleanliness of the evaporator and condenser coils. Dirt, dust, and debris that amass on these vital components can hinder their ability to absorb heat effectively, leading to diminished cooling performance and energy efficiency. This article will provide a detailed explanation of the cleaning procedures for air conditioning evaporators and condensers.

Understanding Evaporators and Condensers

Firstly, it is crucial to understand what evaporators and condensers are. The evaporator coil is responsible for absorbing heat from your home’s indoor air while the condenser coil dissipates this heat into the outdoor atmosphere. They play pivotal roles in maintaining a comfortable temperature within your home.

Evaporator Coil Cleaning Procedure

Before you commence any cleaning task, turn off the power to your air conditioning unit for safety purposes.

  1. Open up the unit: Begin by removing the front panel of your indoor air conditioning unit (where the evaporator coil is located), which often involves unscrewing several screws.
  2. Inspect the coil: Once open, inspect the condition of the coil. If there are visible dust or dirt particles on it, it will require cleaning.
  3. Vacuuming: Using a soft brush attachment on a vacuum cleaner, gently clean away any loose dirt or dust from the coil.
  4. Use no-rinse coil cleaner: Spray a no-rinse coil cleaner across the coils – this foam will bubble up and then drain off into your unit’s drain pan, taking any remaining dirt along with it.
  5. Clean Drain Pan: After allowing time for any residue to drip off into your unit’s drain pan, it’s important to clean out this pan as well.

Condenser Coil Cleaning Procedure

Cleaning the condenser (the outdoor unit) follows a similar method but with extra steps due to its exposure to the outside elements.

  1. Shut off power: As before, ensure the power is turned off at the source and at the air conditioner.
  2. Remove debris: Before opening the condenser, remove any leaves or debris around it that could potentially get inside.
  3. Open up the unit: Remove the outer casing and protective grilles from the condenser.
  4. Inspect and Vacuum: Check for any visible signs of dirt or blockages on the coil and vacuum away what you can, using a soft brush attachment.
  5. Use Coil Cleaner: Spray on a commercial coil cleaner and let it sit according to manufacturer instructions. Rinse with water if recommended by cleaner’s guidelines.
  6. Rinse Coil: If your coil cleaner requires rinsing, gently rinse off with a hose – be careful not to bend or damage any fins on your coil during this process.

Remember that rigorous maintenance of your evaporator and condenser can significantly extend your air conditioning unit’s longevity and performance while helping prevent potential breakdowns. If you are uncomfortable performing these tasks yourself, consider hiring a professional HVAC technician who can perform regular maintenance on your unit for optimal efficiency and cooling performance.

Air Conditioner Repair and Maintenance in Woodbridge, VA: Understanding the Importance of Fan Motor Replacement

The functioning of an air conditioning system relies heavily on several key components, one of which is the fan motor. This component plays a crucial part by helping to regulate the temperature inside your space and ensuring efficient operation of the system. Therefore, fan motor replacement is an integral step in the air conditioner repair process that cannot be overlooked.

Understanding the Role of the Fan Motor

The fan motor in an AC unit serves two major functions. Firstly, it helps to disperse cooled air throughout your space by driving the blower fan. Secondly, it aids heat transfer by driving the condenser fan to blow over the condenser coil and dissipate heat outside your home or office.

Identifying Fan Motor Problems

  • Unusual noises from the AC unit
  • The system frequently turns on and off
  • The AC unit vibrates excessively
  • The air conditioner doesn’t cool efficiently
  • The circuit breaker frequently trips when you turn on the AC

Should you notice any of these signs, it is recommended to seek professional assistance for accurate diagnosis and consequent repair or replacement.

Steps in Fan Motor Replacement

  1. Power Off: Always ensure that the power supply is disconnected before starting any repair work.
  2. Accessing the Fan Motor: This involves removing screws and panels to reach the motor housed inside.
  3. Disconnecting Old Motor: With careful examination, disconnect all wiring connected to the old motor.
  4. Removing Old Motor: After disconnecting all wires, carefully remove attachments holding down the faulty motor and take it out.
  5. Installing New Motor: Align new motor into place ensuring correct orientation, secure it with attachments and connect all necessary wires.
  6. Testing the New Motor: Once installed, reconnect power and test the AC unit to ensure the new motor works properly

Importance of Professional Service

Although this guide provides a basic understanding of fan motor replacement, it is important to remember that air conditioner repair is a complex process. It requires proper knowledge of electrical components and correct handling to avoid any potential risks. Therefore, it is always recommended to hire professional service for any type of air conditioner repairs.

Fan motor replacement is a pivotal part in maintaining the efficiency and lifespan of your air conditioning system. With professional help, you can ensure that this crucial component is well-maintained, leading to a comfortable and refreshing space for you to live or work in.

HVAC Installation Woodbridge VA: Different Types of Units and Their Specific Needs

Understanding the diverse types of air conditioning units is crucial to identifying their specific repair needs. Each type is unique in its design, operation, and consequently, its repair requirements. In this section, we will delve into the various types of units and throw light on their distinctive repair needs.

Window Air Conditioners

Window air conditioners are compact units, designed for single room cooling. The components – condenser, compressor, expansion valve or coil, evaporator and cooling coil are all housed in a single box.

Repair Needs: Often, issues with window ACs revolve around refrigerant leaks or electrical problems. A common issue is also related to the thermostat sensor located behind the control panel which can sometimes get knocked out of position affecting its functionality. Regular maintenance like cleaning or replacing filters and checking thermostat settings can prevent most repair issues.

Split Air Conditioners

Split ACs comprise two parts – an indoor unit and an outdoor unit that houses the compressor. The indoor unit contains the cooling coil and air filter while the outdoor component houses components like compressors and expansion coils.

Repair Needs: Leakage in refrigerant lines and problems with outdoor fans are common with split ACs. The drain channels might also get clogged causing water leakage from indoor units. Regular cleaning of filters can help prevent most issues.

Central Air Conditioning Systems

Central systems are used for cooling big buildings, houses, offices etc., using a large compressor capable of producing tons of air conditioning.

Repair Needs: These systems often encounter issues related to insufficient cooling due to leaks in ductwork or a lack of refrigerant. Another common problem is operational malfunctions due to faulty thermostats or sensors.

Portable Air Conditioners

Portable conditioners are movable units that transfer heat from one room to another where it can be discharged.

Repair Needs: In most cases, repairs for portable ACs involve fixing issues with condensation as these units often struggle with managing humidity. There can also be failures in the exhaust system leading to overheating of the unit.

Hybrid/Dual Fuel Air Conditioners

These conditioning units utilize a heat pump system and furnace making them energy-efficient and cost-effective.

Repair Needs: Hybrid systems primarily face issues with their complicated control systems which require professional technicians to fix. Problems might also arise due to refrigerant leaks or issues with compressors.

Remember, the best way to avoid frequent repairs and improve the longevity of your air conditioning unit is through regular maintenance and professional servicing. Each type of air conditioner has its unique repair requirements that should be addressed promptly to ensure optimal functionality. Understanding these requirements can help you take appropriate measures when problems surface, thus ensuring your comfort in every season.


Air-Conditioning Service Archives - Page 10 of 18 - GsaabG AC Services

The LG Artcool air conditioning system is a popular choice among homeowners and businesses for its sleek design, quiet operation, and superior cooling capabilities. An integral part of interacting with this system is understanding the infrared remote controller. This guide will help you understand its functions and proper usage.

Exploring Air Conditioner Options in Woodbridge VA

  • Power Button: The power button switches the air conditioning system on and off.
  • Temperature Control Buttons: These buttons are used to increase or decrease the temperature settings of the AC unit.
  • Mode Button: This button allows you to switch between different operating modes such as cool, dry, fan, heat, and auto.

HVAC Installation Woodbridge VA: Setting Your System’s Operation Mode

You can set your preferred operation mode by pressing the mode button until your desired mode is displayed.

  • Cool Mode: The AC unit will cool your space based on your set temperature.
  • Dry Mode: This mode dehumidifies your space while also slightly cooling it.
  • Fan Mode: Only the fan will run to circulate air in your space.
  • Heat Mode: The AC unit will heat your space based on your set temperature.

Adjusting Fan Speed

To adjust fan speed, press the ‘Fan Speed’ button until you reach your desired level: Low, Medium, High or Auto.

Using Sleep Mode

For quieter operation during sleep hours, press ‘Sleep’ button. The system would modulate operations to provide a quieter environment.

Timer Functionality

One of the key features of this system is its timer functionality. You can set it to switch off after a certain number of hours by pressing ‘Timer’.

In short, understanding how to operate the infrared remote controller for an LG Artcool air conditioning system is essential for maximizing the unit’s functionality and your comfort. By familiarizing yourself with the various buttons and modes, you can ensure that your air conditioning system is always operating at its optimal performance.

Remember to always replace the batteries of your remote controller in a timely manner, to prevent any interruptions in your AC operations. Also, keep the remote controller clean and store it properly when not in use to ensure it lasts a long time.

By following this guide, you can use your LG Artcool air conditioning system more effectively, allowing it to provide you with superior comfort while also conserving energy.

Understanding the Importance of Superheat in Measuring the Refrigerant Charge in Air Conditioning Systems

When it comes to keeping your air conditioning system running at its peak, one of the key things you need to understand is the concept of superheat. This crucial parameter is involved in measuring the refrigerant charge in air conditioning systems.

In simple terms, it’s how much hotter the refrigerant gas is compared to its boiling point under current pressure conditions.

Why Does Superheat Matter?

  1. It ensures that liquid refrigerant does not return to your compressor. The compressor of an air conditioner is designed specifically for gaseous refrigerants, not liquids. If liquid refrigerants were to enter, severe damage could occur.
  2. It confirms that your system has the correct amount of refrigerant. Too much or too little charge can lead to inefficient operation and potential damage.

Hence, when technicians are charging an air conditioning system with refrigerant, they need to measure and adjust superheating correctly.

To measure superheat, you will require two readings: suction line temperature and suction pressure.

On this chart, find your pressure reading (converted from PSIG to absolute pressure), which gives you corresponding saturation temperature or boiling point at that particular pressure.

The resulting value is your system’s superheat.

Adjusting Superheat Levels

Superheat can be adjusted by adding or removing refrigerant or adjusting the system’s expansion valve. However, it should be carried out by a professional technician since improper adjustments can lead to poor performance or potential damages.

  • Too high superheat:This could mean that your AC system is undercharged with refrigerant or that your expansion valve is set too ‘tight. ‘ The technician may need to add more refrigerant or adjust the valve accordingly.
  • Too low superheat:In this case, it could imply overcharging or a ‘loose’ setting on the expansion valve. Your technician will likely remove some refrigerant or adjust the valve.

In either case, understanding and correctly managing superheat is vital in maintaining the refrigerant charge and overall health of air conditioning systems. Therefore, regular checks and adjustments by professionals are recommended for efficient operation of your AC unit.

Effective AC Repair Services in Woodbridge VA

Understanding the exact functioning of your air conditioning systems is key to efficient management and maintenance of the unit. A pivotal aspect to be aware of in this regard is the way refrigerant charge is measured within these systems. This information can help diagnose potential issues, optimize performance, and maintain energy efficiency.Superheat and Subcooling. Let’s delve into their meanings, differences, and importance.

What is Superheat?

Superheat refers to the temperature increase in a refrigerant that has transformed from a saturated vapor to a superheated vapor. This process occurs after all the liquid refrigerant has evaporated in the evaporator coil.

  • It provides a measure of heat absorption in the evaporator.
  • It’s important for keeping the compressor safe by ensuring no liquid gets back into it.
  • The correct level of superheat helps to maximize system efficiency.

What is Subcooling?

Subcooling relates to how much a refrigerant has been cooled below its saturation temperature (boiling point) at a given pressure, before it leaves the condenser. Here, refrigerant changes from saturated vapor to saturated liquid.

  • It indicates how efficiently heat rejection happens in the condenser.
  • High levels can lead to decreased capacity and indicate overcharging.
  • Proper subcooling ensures there’s enough liquid refrigerant entering the expansion valve.

Now that we understand what each term means individually, let’s compare them side by side –

Superheat Subcooling
Definition Amount of heat absorbed beyond boiling point Degree below boiling point at which liquid is cooled
Where it happens In the evaporator In the condenser
Impact Maximizes system efficiency, protects compressor Increases capacity, indicates overcharging
Measurement Useful when the AC system has a fixed metering device Useful when the AC system has a thermostatic expansion valve

The Importance of Both in Air Conditioning Systems

Keeping tabs on both superheat and subcooling measurements plays an essential role in maintaining optimal performance from your AC unit.

For superheat, too low levels can lead to liquid refrigerant getting back to the compressor (liquid slugging), which may cause damage. High levels, on the other hand, can indicate low refrigerant levels or issues with airflow across the evaporator coil.

In terms of subcooling, high levels typically suggest overcharge of refrigerant or an issue with the metering device. Low levels indicate undercharge or problems with the condenser airflow.

In essence, knowing how these two principles work will help in troubleshooting potential issues and optimizing AC performance for greater efficiency and longevity. Remember that precise measurements vary based on manufacturer recommendations and specific models – always refer to your unit’s manual or consult a professional for technical guidance.

Superheat Versus Subcooling: A Detailed Comparison for Effective Measurement of Refrigerant Charge in Air Conditioning Systems

Air conditioning systems rely on the precise management of refrigerant charge to achieve optimum performance and energy efficiency. Two key parameters in this context are superheat and subcooling. These two factors are used to assess and manage the refrigeration cycle, ensuring that the system operates effectively without damaging its components. This section will delve into a detailed comparison between superheat and subcooling, providing insights on how each parameter can aid in measuring the refrigerant charge accurately.

Understanding Superheat

Superheating refers to the process where all refrigerant in the evaporator changes from a low-temperature vapor to a high-temperature gas. This process is critical because it ensures that only gas enters the compressor, preventing any damage caused by liquid refrigerants.

  • Compressor operating without noise
  • The suction line is cool to touch
  • Sufficient cooling provided by the air conditioning system

Understanding Subcooling

On the other hand, subcooling pertains to the cooling of liquid refrigerant below its condensing point or saturation temperature. The purpose of this step is to ensure no vapor enters the expansion device, which could affect its operation.

  • Warm liquid line
  • The high-pressure gauge reading matches target subcooling
  • Adequate cooling capacity

Comparing Superheat and Subcooling

While both superheat and subcooling are integral parts of managing your AC’s refrigerant charge, they serve different purposes in various system conditions. Superheating primarily protects compressors from potential damage caused by liquid refrigerants, while subcooling ensures maximum efficiency by verifying that no vapor enters the expansion device.

However, both these measurements are interconnected. An efficient air conditioning system will demonstrate accurate levels of both superheating and subcooling. This balance is critical to maintaining the longevity and productivity of your AC system.

Superheat Subcooling
Definition The amount of heat added above the boiling point The amount of cooling below the saturation temperature
Purpose To ensure only gas enters compressor To ensure only liquid enters expansion device
Measurement Process Measured at the outlet of the evaporator coil Measured at the outlet of the condenser coil

Recognizing and Addressing Issues

Recognizing issues related to superheat or subcooling is crucial in maintaining your air conditioning system’s refrigerant charge. On the other hand, low subcooling can imply an undercharged system, while high levels could suggest overcharging or airflow problems.

Addressing these issues promptly will result in better energy efficiency, enhanced performance, and prolonged lifespan for your AC system. It’s always recommended to consult with a certified HVAC technician for accurate diagnosis and resolution of any issues related to refrigerant charge management in your air conditioning system.

Air Conditioning Repair Woodbridge VA: A Comprehensive Guide to Understanding and Resolving HVAC Issues

An overcharged air conditioning system can be detrimental, potentially causing significant damage to the AC system or compressor. Recognizing the symptoms and learning how to rectify an overcharged system are essential steps in maintaining an efficient and long-lasting cooling system.

Recognizing Overcharged Air Conditioning Systems

Before diving into how to correct overcharging, it’s important to know how to identify it.

  • High Discharge Pressure:Overcharging can cause a rise in discharge pressure, pushing the condenser’s limits and resulting in its inability to effectively release heat.
  • Low Suction Pressure:The suction pressure might decrease due to refrigerant flooding back, which prevents the evaporator from absorbing enough heat.
  • Increased Compressor Temperature:The compressor temperature may escalate due to increased stress put on it by the excessive refrigerant.
  • Poor Cooling Performance:Despite running constantly, an overcharged AC system might not cool your spaces efficiently.

Addressing Overcharging in Air Conditioning Systems

  1. Confirm the Problem: Use a manifold gauge set designed for your specific refrigerant type. Connect it to your AC system’s service ports and read the pressure levels. If both high-side (discharge) and low-side (suction) pressures are above normal levels, your system is likely overcharged.
  2. Deflate the System: To reduce the amount of refrigerant, attach a refrigerant reclaimer’s hose onto your AC service port. Open its valve until pressures return to normal levels.
  3. Check Superheat & Subcooling Levels: Correctly charging an AC involves more than just adjusting pressures; measuring superheat and subcooling is crucial too. Your AC should have specifications for these levels. If they’re off, adjust the refrigerant charge until they match the required levels.
  4. Inspect Your AC’s Performance: After adjusting, run your AC system for 15-20 minutes and monitor its performance. Review all parameters, including discharge and suction pressures, superheat and subcooling levels, and overall cooling effect.
  5. Call a Professional If Needed: If you’re not confident in performing these steps or if the issues persist even after making adjustments, it’s time to call a professional HVAC technician.

Remember that dealing with refrigerants should be approached with caution as they can be hazardous substances. Always refer to your owner’s manual or consult a professional if you’re uncertain about anything. By learning to recognize and address an overcharged refrigeration system, you can ensure your AC operates optimally while preventing potential damage or degradation of its components.


AC Installation Charges In Jaipur | AC Gas Filling Charges In Jaipur | AC Service Charges In Jaipur- Sfastservices

Cleaning your air conditioner at regular intervals is crucial for its enhanced performance and longevity. When you clean the air conditioning unit, it can function more efficiently by reducing energy consumption and subsequently, decreasing your energy bills. It also ensures that the released air is clean, fresh, and healthy to breathe.

Understanding Air Conditioning Repair in Woodbridge VA

Air conditioners absorb dust and dirt during their operation. The accumulated debris can clog the filters, reducing their efficiency and increasing energy consumption. Moreover, dirty air conditioners can harbor harmful microorganisms (like mold and bacteria), leading to foul odors and potential health hazards such as allergies or respiratory problems.

  • Improved efficiency: A clean unit performs better than a dirty one. It cools down your space quickly with less energy.
  • Reduced repair needs: Regular cleaning minimizes the chances of component failure which in turn decreases the need for repairs.
  • Prolonged lifespan: A well-maintained AC lasts longer than a neglected one.

Understanding the Process of HVAC Installation in Woodbridge VA

  1. External Unit Cleaning: Start by cleaning the external unit. Remove any debris from around it. Use a damp cloth to wipe down the outer surface.
  2. Filter Cleaning: Unplug the unit, open the front cover, and carefully remove filters avoiding any damage to them. Rinse them under running water or use vacuum cleaning if there’s stubborn dust present.
  3. Internal Unit Cleaning: Use a vacuum cleaner for this step too but be careful not to damage any delicate parts inside.
  4. Coil Cleaning: Spray coil cleaner on both indoor and outdoor coils following manufacturer’s instructions properly.
  5. Drain Line Cleaning: Lastly, ensure the drain line is clear from any blockages to prevent water backup.

Preventing Common Errors During the Cleaning of Your Air Conditioner

  • Avoid using harsh chemicals for cleaning filters and coils as it may damage them.
  • Do not rush while cleaning. Hastiness can lead to accidental damage to sensitive components.
  • Always turn off and unplug the system before starting your cleaning procedure.

Seeking Professional AC Repair Services in Woodbridge VA: Identifying the Right Time

  • The unit still isn’t cooling efficiently after cleaning.
  • There’s visible mold growth in or around your AC.
  • You notice strange noises coming from your unit.
  • Your energy bills have increased drastically without any reason.

Remember, professional technicians have specialized knowledge and tools that are essential for diagnosing and repairing complex problems effectively.

Understanding the Importance of Keeping Your Air Conditioner Cleaned

  • Efficient Performance: Dust and debris can greatly affect the performance of an air conditioner. They block the airflow, making it difficult for the system to cool down the room efficiently. A clean air conditioning unit performs optimally, delivering cool and fresh air consistently.
  • Cost-Effective: A dirty air conditioning unit has to work harder to provide the desired temperature, which results in increased energy consumption. By keeping your AC clean, you can ensure its efficient performance and save on electricity costs.
  • Longer Lifespan: Regular cleaning minimizes wear and tear on the components of your AC unit, extending its lifespan. This saves you from frequent expensive repairs or even replacement of the entire unit.
  • Health Benefits: An uncleaned air conditioner may circulate dust, bacteria, or mold spores in your home or office. This can lead to respiratory problems or allergies. Cleaning your AC ensures that it filters out these pollutants effectively, improving indoor air quality.

Maintaining a regular cleaning schedule for your air conditioner will help ensure these benefits.

Air Conditioner Maintenance Tips for Woodbridge VA Residents

  1. Switch Off Power: Always start by turning off the power supply to ensure safety during cleaning.
  2. Remove Filters and Clean: Take out filters from your unit and gently wash them with mild soap and warm water.
  3. Clean Condenser Coils: These coils can collect a lot of dirt over time which affects performance; use a coil cleaner to clean these parts thoroughly.
  4. Inspect Fins: Fins on the condenser coils can sometimes be bent. Straighten them with a fin comb.
  5. Clean Around the Unit: Make sure the area around your AC unit is clean and free from obstructions that could block airflow.

While regular cleaning can be done on your own, it’s essential to have your air conditioner professionally inspected at least once a year. This will help you catch potential problems early and maintain your unit in top shape. Regular cleaning and maintenance of your air conditioning unit are investments that pay off in comfort, cost savings, and health benefits.

Navigating the Intricacies of Cleaning a Split System Air Conditioner

Cleaning a split system air conditioner might seem like a challenging task due to its complex structure, but with a proper understanding of its parts and functioning, it becomes relatively easy. It’s crucial to maintain the cleanliness of your air conditioner to ensure its long-lasting performance and efficiency. Below is a step-by-step guide on how to clean a split system air conditioner.

  • A screwdriver
  • A cloth or sponge
  • Warm soapy water
  • Vacuum cleaner with soft brush attachment
  • Air conditioner coil cleaner

Also, remember to switch off the power supply before starting the cleaning process to prevent any accidents.

Start by removing the filters from your air conditioning unit. These are usually situated behind the front panel. Use your vacuum cleaner to remove any dust or dirt from them and then wash them in warm soapy water. Once they are thoroughly clean, let them dry completely before reinserting them back into their original place.

The next step is cleaning the coils which are located inside your split system unit and outside unit. Apply coil cleaner according to its instructions on both sets of coils and allow it time to work on loosening dirt and grime. Then rinse it thoroughly with water by either using a hose or spray bottle.

The outdoor compressor unit also needs cleaning as it’s exposed to various weather conditions that cause dust accumulation over time. You can use your vacuum’s soft brush attachment for this task, gently removing debris from around and within it.

Finally, you should also clean out the drainage hose which is generally located at the base of the indoor unit. This can be done by using a wet/dry vacuum to suck out any accumulated debris that may cause clogs.

After performing these steps, your split system air conditioner should work more efficiently and produce cooler, cleaner air for your comfort. However, it is important to understand that not all cleaning tasks are suitable for the DIY approach; some require professional expertise. You should always consider hiring a professional if you’re unsure about any aspect of cleaning your air conditioner or if it requires more in-depth repairs.

Preventing Common Errors During the Cleaning of Your Air Conditioner

Cleaning an air conditioner unit is not a self-explanatory task, and it’s quite possible to make some mistakes along the way, especially if you’re attempting this for the first time. To ensure you avoid any pitfalls, we’ve compiled a list of common errors made during DIY air conditioner cleaning and how to prevent them.

Not Disconnecting the Power

Always remember safety first. Before you begin any cleaning or maintenance on your air conditioner, ensure that it is disconnected from the power supply. Failing to do so can put you at risk of electric shock or cause damage to your unit.

Solution: Locate your circuit breaker and turn off the switch that corresponds to your AC unit.

Using Harsh Chemicals

While it’s essential to clean your AC thoroughly, using harsh chemicals can lead to more harm than good. They can corrode parts of the unit and possibly lead to premature failure.

Solution: Use gentle soap solutions or specific AC cleaning products that are designed not to harm its components.

Ignoring the Filter

The filter is an integral part of an air conditioner. Unfortunately, it’s also one of the most overlooked parts during cleaning, which can cause reduced efficiency and potential damage over time.

Solution: Regularly clean or replace your filters according to the manufacturer’s instructions.

Spraying Water Directly on The Unit

It might seem like a good idea to simply spray water on outdoor units for a quick clean but this could cause damage by forcing dirt deeper into coils or wetting sensitive electronic parts.

Solution: Instead use a brush or vacuum cleaner for surface dust and grime before gently rinsing with water from a garden hose.

Not Checking The Drain

The condensate drain line is another often-overlooked component when cleaning an AC unit. If this becomes clogged, it can cause water damage inside your home.

Solution: Regularly check the condensate drain line for clogs, and remove any debris blocking it.

Cleaning your air conditioner is a careful process that requires attention and diligence. Avoiding these common cleaning errors can add years to the lifespan of your system, improve its efficiency and spare you costly future repairs.

However, if you encounter complex issues or are uncomfortable performing these maintenance tasks yourself, consider hiring a professional air conditioning technician. They have the skills and experience to handle all aspects of AC maintenance and repair safely and effectively.

Deciphering the Right Time to Seek Help from a Professional Air Conditioning Technician

The significance of maintaining your air conditioner regularly cannot be overstated. This not only increases its longevity but also enhances its efficiency and effectiveness. While several maintenance tasks, such as cleaning or replacing the filter, can be done by yourself, you may need to seek professional help in certain situations. Knowing when to bring in a professional air conditioning technician can save you time and money in the long run.

Unusual Noises

If your air conditioner is making unusual noises such as squealing, grating, or grinding, it suggests that something might be wrong with the system’s internal components. This isn’t something you should attempt to fix by yourself as it may require advanced expertise and special equipment. In such cases, contact a professional technician immediately.

Frequent Breakdowns

Your air conditioner should not be breaking down often if it’s properly maintained. Frequent breakdowns are typically an indication of an underlying issue within the system. Instead of repeatedly spending on repairs or temporary solutions, it’s advisable to get a comprehensive inspection done by a professional technician.

Insufficient Cooling

If your air conditioner seems to struggle with cooling your home adequately despite having a clean filter and being set at an appropriate temperature, it could indicate several issues including low refrigerant levels or problems with the compressor. Diagnosing these issues requires technical knowledge and tools; this is best left to professionals.

High Energy Bills

A spike in your energy bills without any significant change in AC usage can be an indicator of declining AC efficiency due to underlying issues like leaking ducts or a failing motor. Such complex problems need skilled examination from experienced technicians.

Old Age

Air conditioners typically have a lifespan of 10-15 years. If your unit is nearing this age and starting to display performance issues, it may be time for professional intervention. A qualified technician can advise you on whether it would be more cost-effective to repair the existing unit or to invest in a new one.

Water Leaks or Freeze

Your air conditioner might occasionally produce some moisture. However, excessive water leakage or any sign of freezing is not normal and indicates serious issues that require immediate professional attention.

Incorrect Thermostat Readings

If your thermostat isn’t accurately reading or regulating the temperature, this could mean there’s a problem with the sensor or the control board. A professional technician can diagnose and fix these issues efficiently.

While it’s good to take on some air conditioner maintenance tasks yourself, knowing when to call in a professional technician can prevent small problems from escalating into larger, more costly ones. It also ensures that your air conditioner continues to function well, keeping your home comfortable throughout the seasons.